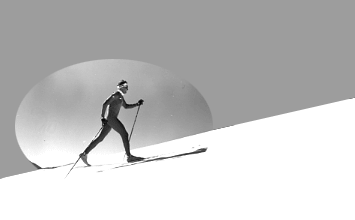
FIVE TIPS FOR BETTER CLASSIC SKIING
Level:
By Mark Pearson
INTRODUCTION
Not long ago, many in the sport of cross-country were
resting flowers on the grave of diagonal skiing. Skating had
so many good points; no-bother waxing, fast and so easy to
learn. It was good reason to wonder, "Why do anything else?".
But now, diagonal is making a comeback. Skiers are
rediscovering a natural movement that's pleasurable, fun, and
versatile.
We'll take look at diagonal skiing for some hints to
change our stride into a sleek new speed machine.
1. STAND IN THE RIGHT POSITION / GET HIP
Our first step is a forward body position for efficient
and relaxed skiing. Often, skiers that lack balance take one
of two extremes of body position. One is a low crouch with
hips flexed with knees buckling underneath. The other
extreme is standing upright with our back perpendicular to
the snow. Both positions force weight over the back foot
making it difficult to transfer weight over the forward ski.
Find a comfortable stance that allows you to balance over the front ski. Think forward lean and hip rotation.
A forward and balanced
body position requires only a slight flex in the knees and
ankles. Our goal
is a stance that if
someone told us to "freeze" our glide in the diagonal stride,
we could balance indefinitely on that single ski.
Our first step is to learn how maintain a forward lean
our upper body without excessive bending at the hips. Here's
the sensation we want for hip positioning. Stand on one leg
then flex the ankle to lean the entire body forward. Continue
leaning forward until our other foot swings underneath to
prevent an uncomfortable body slam to the ground. Notice
that when the hips approach a position above the knee it's
time for our forward step. We aren't bending at the hips as
much as we're leaning forward with the hips.
The next step is a slight hip rotation that follows the
forward swing of the rear leg to increase balance. The role
of hip rotation is to help our upper body move forward with
the gliding ski. Here's an exercise to increase hip movement.
Hips should be flexible so that as one leg swings ahead to
glide, that side of the hip should twist forward and move
with it. As we
swing the right leg
ahead, the right hip rotates forward too... The same with the
left side. Only a slight twisting movement of the hips is
needed to keep our upper body above the gliding ski at all
times.
Once our hips and lower body are where we want them,
it's time to see if we have the maximum forward lean of the
upper body. The test I like to use is the "ball of the foot
to heel test". Using the poles, ski along at a relaxed pace.
For a few strides, glide with weight over the ball of the
front foot. You may feel the wax or waxless pattern grip on
the snow and begin to slow the ski down but that's O. K. Our
objective is to determine how the upper body reacts as we
glide on the ball of the foot. Normally, the upper body
leans forward to pressure that point. This exaggerated lean
is what we want. Keep this inclined body position but now
change the weight of the gliding foot back between the arch
and heel - "the spot". This improves
glide while keeping that forward position of the upper body.
Use this test periodically as a reminder of maximum forward
upper body lean.
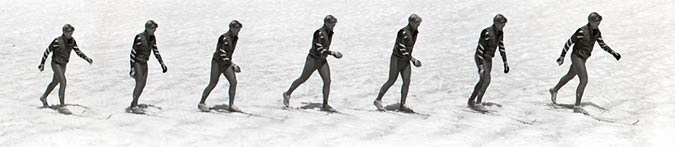
Terrain: Slight Uphill
Here's a athletic 20 year old (Sara) with a few days of technique instruction. Our main goal was to stay balanced over the front gliding ski. Notice the short-gliding steps and how the body stays over the front ski while gliding. This also shows a nice consistent rhythm of the stride, aided by a bounce in the knees to help pressure the ski for grip. The key words here are Balance and Rhythm.
What could we work on from here?
1). Lengthen the stride a little to increase glide
2). Adding more pressure to the poles for a longer pole push
3). More fun ski time Notes: Her waxless skis were a bit too long for her so her grip was on the slippery side.
Way to go girl!
2. NOW THE KICK
Getting wax or a waxless pattern to work, even when its
not as gripping as it could be, is the sign of a good cross-country skier. Body rhythm and knowing how to pressure the
foot is the key for maximum grip.
Here's an exercise to help feel the definite rhythm in
the diagonal stride. Leave the poles on the side of the trail for a moment then begin swinging the arms diagonally, forward
and back. As the arms swing, let the knees relax and bounce
naturally. Notice that as our arms swing past our side, the
knees flex. Then as one hand is forward and the other is
back, our knees straighten. Use this rhythm to provide a
little "umph" to the kick during the diagonal stride.
The downward pressure of the "kick" starts when the feet are together and continues until the foot lifts off the snow
As the arms pass the hips, the knees flex to begin a
vigorous kick. It's a coiling
effect like the movement of a cat just before it leaps on a
trailing string. Just before the leap, it flexes it's hind
legs for a more powerful pounce. In skiing this movement
comes as a little hitch just before the kick. (see below)
Once we feel comfortable with rhythm, it's time to think
about pressuring the ski as early as possible. The key to
this "early kick" is pressuring the heel area first, then
with the ball of the foot.
As I mentioned in the first section, we want to glide
with our weight between the arch and heel. Take advantage of this same spot to begin the kick while
our full body weight is directly over the foot. If we wait to
kick off the ball of the foot, when the ski is behind us, we
won't have the full weight of our body to punch the ski down.
Utilizing the full weight of our own body helps pressure the
wax or pattern for maximum grip.
It's a coiling
effect like the movement of a cat just before it leaps on a
trailing string. Just before the leap, it flexes it's hind
legs for a more powerful pounce. In skiing this movement
comes as a little hitch just before the kick.
Practice the kick-off by pressuring the "heel" first
then maintain that pressure during the entire kick with the
last push-off from the ball of the foot. Imagine there are
small tacks pointed in the snow ahead of us, all perfectly
paced so that one is centered under our heel, the other under
the ball of the foot. To begin the kick push in the heel tack
first, the front tack second. Think how a runner lands on
their heel then rocks forward on the entire foot for a final
push-off from the toes. In cross-country skiing we glide on a
flat foot underneath the body then start pressuring off the
heel and finish the push from the ball.
3. IMPROVE MOMENTUM
Till now, we've worked on forward hip and body position
to improve glide, and pressuring the ski for ultimate grip.
Our next step is increasing forward momentum with a
deliberate forward swing of the rear leg.
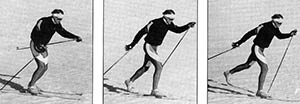
This example shows a good final form of bringing the back foot through in one complete motion
A lazy back leg is the most common fault in preventing
good forward momentum. In this situation the back foot swings
forward in two motions. As our leg extends behind, after the
kick, it moves forward a few inches and stops, then
continues its forward swing underneath the body to glide. In contrast, the ideal movement has the back leg
swinging forward in as one continuous movement. A deliberate
forward swing of
the back leg helps with momentum of the new gliding ski. As
we press down on the kicking foot we want to simultaneously
drive the opposite leg ahead.
This will generate enough momentum to help us glide even with
less then powerful kick or slippery skis.
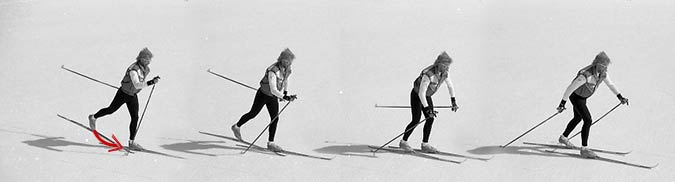
One lesson exercise is called "Floating the Back
Foot". In this exercise we let our rear foot float, or freeze,
for a moment before swinging it forward. At the same time, we
would quickly plant our poles into the snow to begin the pole
push. This deliberate pole plant and push actually helped our balance, while holding the
back foot up and off the snow. This same
exercise puts us in a body position to master forward leg
drive.
After the kick propels the foot off the snow behind us,
let it stay up for a moment then quickly plant the pole and
begin pushing down. The rear foot shouldn't begin to move
forward until we've begun pushing on the poles and started to
glide. Now swing the rear leg forward in one deliberate
motion. It's the same momentum as if we were kicking a ball
but the foot lands on the snow below our body, not rising up
in front.
FLOAT THE BACK FOOT: In this exercise let the back foot "float" behind for a moment then swing the foot forward
in one continuous motion
The key to driving the rear leg forward is a balanced
upper body. Remember the hip swing and how it helps to keep
the upper body forward, allowing the legs to work
independently below. Imagine that the upper body has one
static position while the legs move from two positions. The
two positions of the legs are one foot down on the snow
performing the kick while the other foot is behind and off
the snow. To get in the next position both legs move quickly
without unnecessary upper body movement.
4. SKIING UPHILLS
It's within all our abilities to get good grip and glide
in uphill terrain.
The key to skiing uphill's is thinking ahead. Not in the
sense of planning that the hill is coming up in half a
kilometer, but in our technique. Think of movements in front
of our body rather then what's going on behind. Forget about
trying to push the hand well past our hips or trying to get
that long kick-off with that foot trailing off the snow. Correct body position on hills should have us feeling as
if we're standing more upright than we do in the flats. A
common flaw is that once we're on uphill terrain we position
our upper body relative to the flats when instead we should
keep the same position relative to the slope. The Leaning
Tower Of Pizza is in great position for skiing flats but
would lose its uniqueness once it started up hills. It's the
angle of the hill which will make us feel as if we're
standing more upright.
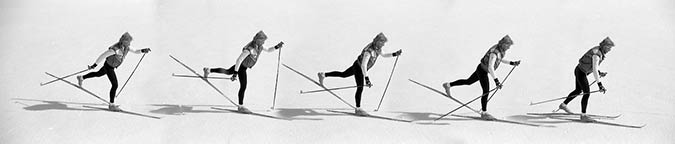
Uphill diagonal stride
One key to staying upright is keeping our eyes focused
toward the top of the hill. Another key is correct hip
position. If we bend forward at the hips, our body moves in
front of our feet, causing the skis to slip. To keep our hips
over our feet practice the "Tina Turner pelvic thrust". Suck
in the stomach to move the belly button in towards the spine
rolling the hips up and forward. When done correctly this
pelvic tilt reduces the arch in our back and brings the hips
in position.
For ultimate uphill grip, use an extreme version of
weighting our heel's to start the kick. This technique is
called a "foot stroke". In this sequence we'll actually
stroke our foot ahead of the knee just prior to the kick.
This stroking motion places our kicking foot forward to
create more downward pressure for grip.
The motion of the foot stroke happens from the knee
down. To feel the foot stroke, stand over flexed legs and
putting one hand over both knees. Now slide one foot forward
until that leg almost straightens. The knees should remain
side by side and not move in front of the other as one foot
strokes forward on the snow. Practice stroking both feet
until it feels fluid and natural.
As we ski up a hill the foot stroke happens just before
the kick, at the tail end of the glide. Begin skiing up and
shorten the stride with a nice bouncy rhythm in the knees.
For momentum, imagine you're nudging a small soccer ball up
the hill. As we nudge the ball let the foot begin its stroke
forward of the knee to begin the kick. Transfer weight with each step for maximum glide.
On a
steep hill this glide may only be the distance that the foot
strokes over the snow.
5. SKI ALL TERRAIN / KICK DOUBLE POLE
Kick Double Pole technique
It's important to learn and utilize all the techniques
for cross country skiing. It not only increases enjoyment but
is also more efficient. The technique to round out our skiing
skills is the Kick Double Pole (KDP).
There are good reasons for using the KDP technique. At
high speeds, it's difficult to maintain balance when kicking
and gliding. The KDP allows us to use slower, balanced,
relaxing movements while maintaining momentum. At the
opposite end, trying to double pole on a slight rise may seem
fast but tiring. In this instance, the Kick Double Pole will
give us the added kick to keep our momentum flowing.
The KDP is precisely how it sounds: a single step or
kick for propulsion followed with a complete double pole. To
get the most out of the technique we'll utilize a few hints
from the preceding diagonal tips to develop better balance by "floating the back foot" and better grip with the "foot
stroke".
Floating the back foot not only tests our balance but
helps us get more power out of the poles by leaning our upper
body weight into the push. To practice, float the back foot
to the extreme. After the kick, quickly plant both poles into
the snow. Before the back foot has a chance to return
forward, begin to push down on both poles. See how long you
can hold the back foot off the snow during the double pole
push.
The forward hip movement also comes into play during
this move. I talked earlier about keeping the hips forward in
the diagonal stride. We should also feel this in the KDP. As
our arms swing forward to begin the double pole, our entire
body should move forward too. Lean the upper body forward
from the ankles so that the only thing preventing you from
falling on your nose are you poles planted in the snow.
The last tip is to improve grip during the kick. We want
to utilize the same foot stroke movement as we did for skiing
uphills. To test this theory for the KDP practice the scooter
kick: multiple kicks with one foot while the other glides on
the snow. Kick with the right foot for a moment and begin to
pressure it as the foot is directly to the side of the
gliding foot. For comparison, now begin the kick by moving
the foot slightly ahead of the gliding foot. With your foot
out in front (Photo 5a), pressure the heel of the kick foot as it nears
the toe of the gliding foot. Continue to pressure the whole
foot to complete the kick. You should find that stroking the
foot ahead prior to kicking supplies better grip.
Stroking the kicking foot ahead in the KDP takes
practice but will feel natural in time. The movements of a
good skier will show a slight scissored motion of the feet at
the completion of the double pole (that is when one foot is
slightly ahead of the other while gliding). This transfers weight to the heels for better glide.
Then, just before the kick, they'll stroke that forward foot
even further ahead. To complete the
double pole,
the opposite foot scoots forward during the glide and becomes
the new kicking foot.